Once the SXT data are read into index and data using YODAT or RD_SDA, it is very simple to display images. A general purpose routine called STEPPER is the most common method used.
STEPPER takes a data cube (data) and allows a user to step
through the images and to display them as a movie. If the index
is passed into STEPPER (as shown in 2 of the examples below) it is
possible to chose an option to display light curves.
Some sample calls are:
IDL > stepper, data
IDL > stepper, data, info_array
IDL > stepper, index, data, xsiz=512
IDL > stepper, index, data, info_array
where info_array and xsiz are optional parameters. xsiz indicates
the size of the displayed image you want (must be an
integer multiple of the original array). It is a
window driven program.
Some other keyword options are start=start to specify the starting image to display; /noscale to not perform automatic scaling on each individual image (uses TV instead of TVSCL); subscript=ss to specify the image numbers to display (default is to display all images in the data cube); /filter_panels to display each unique filter in a different location on the window; /sequence_panels to display each unique image sequence in a different location on the window.
When STEPPER begins, the following menu is displayed.
-------- STEPPER Options --------
There are 259 images in the array
There are 259 images selected
Enter "b" to step backwards                 "h" to call HARDCOPY
      "s" to select new start index         "z" for ZOOM
      "c" to call LOADCT                    "x" for XLOADCT
      "p" to call the IDL PROFILES routine  "l" to call light curve routine
      "g" to overlay SXT solar grid         "o" for observing region location
      "q" to quit                           "m" for movie mode
      "?" to display this help menu         "anything else" to step forward
The user only needs to press the key to select the option (no < CR > required). It is possible to overlay a grid showing the solar limb and latitude/longitude lines for either full frame or partial frame images. The ``l'' option calls LCUR_IMAGE and the user should read section 5.3 for more details.
The routine XSTEPPER is a widget driven routine which operates in a manner
similar to STEPPER, but has some other capabilities. A sample call is:
IDL > xstepper, data, info_array
It is possible to load a data cube into a widget to be ``animated'' using
the routine XMOVIE (which is simply an interface for IDL's XINTERANIMATE).
The speed which the frames can be displayed is quite fast.
There are some memory restrictions which do not allow large data cubes.
Some sample calls are:
IDL > xmovie, data
IDL > xmovie, data, ss=ss ; only displaying images listed in ss
A final popular routine for displaying images is the routine XY_RASTER.
This routine will make a raster pattern of a time series of images
to display time evolution.
The images start at upper left and go to lower right,
and the time is optionally written at the bottom of each
image. Some sample calls are:
IDL > xy_raster, index, data
IDL > xy_raster, index, data, 3, ss=ss
The second example blows the image up to three times its input size and
only displays the images listed in the array ss.
It is the desire of the SXT team to have the routine SXT_PREP used for most of the preparation of the SXT data. The SXT_PREP routine performs a variety of tasks, some of which are described in the following list.
Some important elements of SXT_PREP are:
The steps to using SXT_PREP can be somewhat involved. The basic steps are described below, but the routine XSXT_PREP is an easy way for a user to specify what processing should be performed, and XSXT_PREP is described at the end of this section.
If you only selected PFI images, and the PFI images you selected are all for the same active region, then you do not need to specify the coordinates of an aligned image (it will automatically derive the optimal coordinates by averaging all PFI center locations). If they are not for the same region, then you should either modify your selection so that it only includes one location on the sun, or select a image which all of the data should be aligned to and use the ref_image=index(ialign) option, or you can specify the absolute coordinates (the procedure for establishing those coordinates is described below).
If you have mixed PFI and FFI images, then you can specify one of the partial frame images, and then all images will be registered to that image, and the appropriate portion of the FFI image will be extracted and aligned.
If you selected only FFI images, but you want to extract a portion to
make a registered movie, then you will need to determine the coordinates
for the registered image. A simple method to do this is to use
SXT_GRID. If you want to simply remove the S/C jitter and the SXT
pointing changes (register relative to sun center), then display a full
frame image and call SXT_GRID. An example is:
IDL > tvscl, data(*,*,5)
IDL > sxt_grid, index(5), /read_out, last=loc, /angle
As you move the cursor around, you will see that the values in the small
window are changing. When the cursor is located at the location where
you want the center of your image, press the right button. If you want
to register images and track on a heliocentric coordinate, then you can
use SXT_GRID again to get those coordinates. An example is:
IDL > tvscl, data(*,*,5)
IDL > sxt_grid, index(5), /read_out, last=loc
It is necessary to specify the size of the output image when extracting
a partial frame out of a full frame.
It is possible to pass index and data into SXT_PREP, or to pass the file name array (infil) and the data sets to extract (ss). The results can be returned in the third and fourth parameters (index2 and data2) or they can be written directly to an output file (outfil=outfil).
Below are some examples of how to call SXT_PREP.
IDL > sxt_prep, infil, ss, index2, data2, /reg
IDL > sxt_prep, infil, ss, index2, data2, uncert, satpix, /reg
IDL > sxt_prep, infil, ss, index2, data2, helio=loc, date_helio=date_helio
IDL > sxt_prep, infil, ss, index2, data2, helio=[-9.8,-20.3], $
IDL > date_helio='14-JUN-92 02:37:41')
IDL > sxt_prep, index, data, index2, data2, /reg, ref_image=index(55), outsiz=100
IDL > sxt_prep, index, data, index2, data2, /reg, ref_image=index(55), /helio
IDL > sxt_prep, infil, ss, index2, data2, /reg, /sfd, outres=1, $
IDL > outsiz=[100,200], suncoord=suncoord
IDL > sxt_prep, infil, ss, /reg, outfil=outfil, /dc_interpolate, /normalize
XSXT_PREP provides a graphical user interface to SXT_PREP. The XSXT_PREP routine simplifies the access to the many SXT_PREP options and varied calling sequences. In addition, XSXT_PREP provides a front end to some additional data selection and filtering tools which may be used to fine tune the data set and allows graphical definition of all SXT_PREP input parameters. The following graphical tools are provided:
The combination of graphical interface and online help make this a good
routine to learn through use. It is a main
level routine. For starters, try the following calling sequence:
IDL > .run yodat ; select SXT data cube to process
IDL > .run xsxt_prep ; play around
It is possible to display a light curve of the SXT image intensities using the routine LCUR_IMAGE. This routine is available from within STEPPER so the user can select the option by entering ``l''.
Some examples for calling LCUR_IMAGE directly are:
IDL > lcur_image, index, data
IDL > lcur_image, index, data, lcur
IDL > lcur_image, index, data, lcur, uncert, satpix
IDL > lcur_image, index, data, xsiz=512
IDL > lcur_image, index, data, xsiz=512, /poly
IDL > lcur_image, index, data, xsiz=512, /nonorm, subscript=subscript
index and data are input, and lcur is the output - an
array with the image intensities. uncert and satpix are optional
inputs which are the uncertainty and saturated pixel map which is returned
from SXT_PREP. If these two variables are passed, the routine will mark
points which are saturated or have high uncertainty.
The xsiz option will blow up the image to be 512 pixel wide (an 512
pixels tall if it is square) so that the selection of a region is simple.
-------- LCUR_IMAGE Options --------
Enter "p" to mark and plot light curves (loops until exited)
      "m" to overplot all of the selected light curves
      "r" to display the regions selected ("R" to make a hardcopy)
      "s" to change the method to mark regions to plot.  Currently: RECT
      "d" to call "stepper" to refresh/display a new image
      "z" to reset (zero out) all of the regions saved so far
      "o" to enable/disable over plotting of new curves. Currently: DISABLED
      "6" to enable/disable making 6 window plots.  Currently:      DISABLED
      "h" to produce a hard copy of the most recent light curve
      "H" to produce a hard copy of all selected light curves
      "q" to exit LCUR_IMAGE ("x" will work too)
Enter your option (no return required).  It is case sensitive.
The user can select several different areas on the image and overplot the light curves for each region. The light curves and regions are labeled so that they can be differentiated. Hardcopy options exist, along with several other capabilities. See the documentation header for the program and the Reference Guide for more details.
The following command will display a light curve which uses the integrated total
of the full disk SFD images. There is one plot for thin Al and another one for
AlMg.
IDL > .run plot_sxl
The SXL database must be available on your system for this program to work.
See the section ``Preparing the SXT Data for Analysis (SXT_PREP)'' on page 5.2 for a description of how to align images.
The SXT synoptic maps are constructed from strips extracted from full disk desaturated SXT images made using the thin aluminum filter. Each map depicts a single Carrington rotation. There are three sets of maps, corresponding to strips centered on the central meridian of the solar disk, 45 E longitude, and 45 W longitude. The widths of the strips are determined by the time differences between images. For a given map, as many full disk images are used as are available provided the time difference between contiguous images exceeds 1.5 hours. Due to occasional gaps in the coverage of full disk imagery, some of the synoptic maps show corresponding gaps. The maps constructed from strips centered at the � degree longitudes are distorted at high latitudes because vertical strips are extracted which do not follow the longitude line. The images from which the strips are extracted have been registered to remove the effects of spacecraft pointing changes. Each strip is shifted along the vertical axis so that heliographic latitude 0 is always centered in the assembled map. However, projection effects in the vertical axis have not been removed. This means that the latitude scale is not linear but reflects the cosine projection effect of a spherical structure (the corona) projected on to a flat image.
The following are some examples of how to display the synoptic images which
are in the Yohkoh database. The first example just displays a single
synoptic map for the central meridian for carrington rotation number 1860.
The second example displays three SXT synoptic maps, central, +45 and -45.
The third example has a single synoptic image which is the Kitt Peak
magnetogram for carrington rotation number carrington_rot_num.
The fourth example shows SXT central meridian and the Kitt Peak magnetogram
and He 10830 synoptic maps.
IDL > disp_synop, 1860
IDL > disp_synop, 1860, /allsxt
IDL > disp_synop, carrington_rot_num, /kpmag
IDL > disp_synop, carrington_rot_num, /gbo
An example of how to read one of the SXT central meridian synoptic map
images is shown below, along with an example of how to read a Kitt Peak
magnetogram synoptic map for carrington rotation number 1862.
IDL > rd_xda, '$DIR_GEN_SYNOPTIC/ssc_cr1862a.01', -1, index, data
IDL > img = rfits('$DIR_GEN_SYNOPTIC/gkm_cr1862a.01', header=header)
When SXT_PREP is called with the /register switch, the optical images are automatically aligned to the X-ray images. See the Instrument Guide and the routine GT_SXT_AXIS in the Reference Guide for more details.
The software tools for aligning SXT images and other images is in a very early stage of development. The routine COAL_IMAGE along with some other tools can be used in a fairly manual method to co-align a pair of images.
The alignment between SXT images and other images can be performed by the following steps. The SXT images do not require steps 1 or 2 since the absolute pointing and roll are known for SXT images.
FIT_LIMB is a modified version of SXT_CENTER. It currently requires that you know the
pixel size of the image which is being processed (although the pixel size can be
derived by calling FIT_LIMB multiple times with different pixel sizes until
the diameter of the solar limb outline matches the image). It allows fits to a partial solar limb.
A sample call to FIT_LIMB is
IDL > fit_limb,img,x0,y0,/int,pixel_size=3.97
where it assumes that you have the image to be fit in the variable img.
The /int enables the interactive selection of the initial guess of
the fit. It is very important that the first guess be very close. pixel_size=3.97
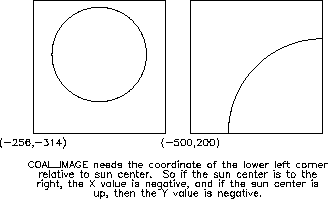
specifies the pixel size in arcseconds. The E/W and N/S sun center coordinates
are returned in x0 and y0. These values must be inverted since we want
the corner coordinate relative to sun center.
IDL > corner2 = [-x0, -y0]
If you have a full disk image with well a defined limb, you can use the routine
DSK_LOCB. A sample call is:
IDL > dsk_locb,img,horzcnt=x0,vertcnt=y0,horzrad=rz,vertrad=ry
IDL > corner2 = [-x0, -y0]
See the Reference Guide or the documentation header for more details on DSK_LOCB.
It is also possible to determine the coordinates of the corner by matching features to another image for which the sun center location is know. This would be necessary for images that do not include the solar limb. No standard piece of software was available when this guide was written so send a request for information to the e-mail address shown in the preface of this guide.
A crude routine called FLASH_COMP is available to take two images and
flash them using XINTERANIMATE. The images are scaled independently
and do not need to be put into an data cube. A sample call is
IDL > flash_comp, img1, img2
Once the image coordinates are known for the non-SXT image(s), you can call
the routine COAL_IMAGE which will co-align one image to another. The
following assumptions are made for the sample calling sequences below.
IDL > pix2 = 3.97 ; pixel size of non-SXT image
IDL > pix1 = gt_pix_size(index) ; SXT image pixel size
IDL > corner1 = gt_corner(index, /from_sc) ; the SXT corner
To convert the non-SXT image to the resolution and align it to the SXT image
you would use the first command below, and you can optionally compare the
newly aligned images with the second command.
IDL > out1 = coal_image(img, corner2, corner1, [256,256], mag=pix2/pix1)
IDL > flash_comp, out1, data
The following are the commands to convert the SXT image to the
resolution of the non-SXT image, and align it to the non-SXT image:
IDL > out2 = coal_image(data, index, corner2, [512,512], mag=pix1/pix2)
IDL > flash_comp, out2, img
There is an optional keyword angle which will roll one image relative to the other if the angle is known. See the description of COAL_IMAGE in the reference guide and the program header for more information.
The SXT X-ray effective area varies across the 42×42 arcmin field-of-view. The shape of the vignette function can be examined with the IDL program HELP_VIGNETTE. At 21 arcmin from the optical axis, the low-energy response ( < 1.49 keV) falls to approximately 75% and the high-energy response (2.98 keV) falls to approximately 50% of the on-axis value (see the Instrument Guide for more details). Because of this, some care should be taken when, for example, making temperature analyses with thin and thick filters of flares that occur near the solar limb.
There are no fully approved routines to remove or correct for the SXT vignette function. There are, however, two preliminary routines. SXT_VIGNETTE will compute the vignette function as it is currently understood. The form and parameters of the shape may be changed as additional data and analysis results become available. The routine SXT_OFF_AXIS will correct for the vignette function by calling SXT_VIGNETTE. Users are warned that these routines are preliminary and may not be the most appropriate technique to use, depending on the scientific application.
It is possible to make a simple display of the sun and to overlay the
box showing the field of view size and location by using PLOT_FOV
if you have the index, roadmap or observing log structures.
A sample call is:
IDL > plot_fov, index, /box
If you don't have a PFI structure, then you can use the routine PFI_LOC.
It can accept a date and time and will display a simple plot of the
sun and the SXT PFI location (PFI_LOC simply reads the observing log
and then calls PLOT_FOV). Some sample calls are
IDL > pfi_loc, '23-jun-93 1:00'
IDL > pfi_loc, timstr, hours=2
The second example will display all of the different PFI locations for
the time stored in the string variable timstr � 2 hours.
If you have displayed a full frame image and you wish to see where the SXT
PFI region was located, you can use the routine PFI_LOC. Assuming that
the index of the image which is displayed is index, then a sample
calling sequence is:
IDL > pfi_loc, index
It is possible to use the hours keyword option to specify the
number of hours plus and minus the full frame time for which you wish to
have PFI locations displayed. When using STEPPER, the ``o'' option will
call PFI_LOC automatically for you, taking into account any rebinning
which was performed on the image.
See section 2.1.4 for some details on routines for listing the SXT partial frame pointing information.
The routine GT_CENTER will allow a user to determine the coordinates of the
center of a PFI image.
The output from this routine can be the location of the center of
the field of view in (a) full resolution IDL pixels coordinates
5, (b) heliocentric,
(c) the angle E/W and N/S from the center of the sun
in arcseconds, or (d) the HXT equivalent pixel coordinates.
If the user has the index available in the variable
index, then he can use the following commands (these commands will
also work for the roadmap structure)
IDL > pix = gt_center(index)
IDL > helio = gt_center(index, /helio)
IDL > helio = gt_center(index, /helio, /string)
IDL > helio = gt_center(index, /helio, /cmd)
IDL > ang = gt_center(index)
The default is to read the ATT S/C pointing database for
the true sun center location. It is possible to use the commanded
S/C pointing information by using the /CMD option, which is much faster
and only of slightly reduced accuracy. The /STRING option
will print the heliocentric coordinates in the format ``N23E45''.
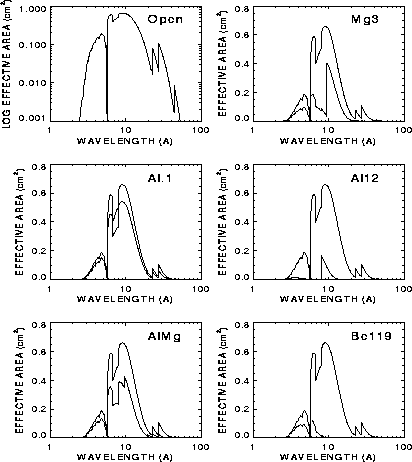
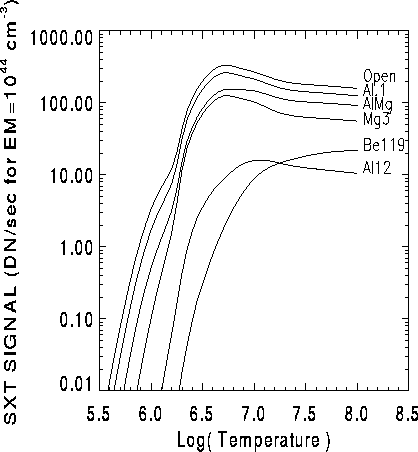
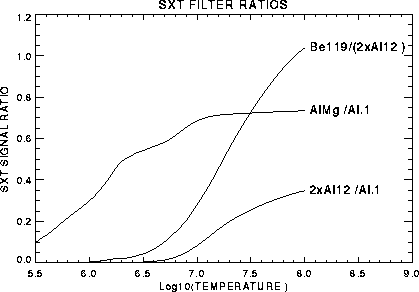
See the Instrument Guide for details on the SXT telescope and filter responses.
The SXT images may be used to compute temperatures after the data have been properly prepared. Normally, SXT_PREP should be called to prepare the data. The steps to follow are given in the next sections.
This can be done using YODAT or by directly reading the data file. If the data consist of observing regions (OR), then do not assemble the data when reading it with YODAT (the data will be assembled by SXT_PREP).
Normally, you should use SXT_PREP to do the decompression, background
subtraction, and stray light subtraction (pinhole leak). For example:
IDL > SXT_PREP,index,data,new_index,new_data,unc,sat
IDL > SXT_PREP,index,data,new_index,new_data,unc,sat,/register
The variables unc and sat are arrays that contain, respectively, the
decompression error and information about the saturated pixels.
It is not necessary to exposure normalize the data.
See the Reference Guide or Section 5.2 of the User's Guide for more information about running SXT_PREP.
It is necessary to select the filters which will be used for the analysis.
The are many ways to do this. An example is given below for the
Al.1 and Be119 filters:
IDL > i1 = where(GT_FILTB(new_index) eq 4) ; Get Be119 indices
IDL > i2 = where(GT_FILTB(new_index) eq 2) ; Get Al.1 indices
IDL > data1 = new_data(*,*,i1)
IDL > index1 = new_index(i1)
IDL > sat1 = sat(*,*,i1)
IDL > unc1 = unc(*,*,i1)
IDL > data2 = new_data(*,*,i2)
IDL > index2 = new_index(i2)
IDL > sat2 = sat(*,*,i2)
IDL > unc2 = unc(*,*,i2)
Because of the design of the SXT and the spacecraft telemetry system,
images are never obtained in two different filters simultaneously. If the solar
fluxes vary rapidly compared to the observing cadence, it is recommended that
you interpolate the intensities of one filter to match the time at which the
data in the other filter were acquired. This can be done using SXT_INTERP,
which will do a linear interpolation on a pixel by pixel basis. An example
calling sequence is:
IDL > SXT_INTERP,index1,data1,ntimes,unc1,sat1
where ntimes is an array of times to which the interpolation should be made.
For example, in the case given here, it would be appropriate to set
IDL > ntimes = index2
in order to interpolate the filter ``1'' data to the times of filter ``2''
data.
Note that SXT_INTERP ``over-writes'' the input variables (to save memory).
The routine SXT_TEEM should be used to compute temperatures from SXT
filter data. This routine will compute the filter ratio and then determine the
temperature and emission measure and uncertainties. Some example calling sequences are:
IDL > sxt_teem, index1, data1, index2, data2, Te
IDL > sxt_teem, index1, data1, index2, data2, Te, EM, dTe, dEM,subs=subs
IDL > sxt_teem, index1, data1, index2, data2, Te, EM, dTe, dEM,$
IDL > sat1=sat1,sat2=sat2,unc1=unc1,unc2=unc2
IDL > sxt_teem, index1, data1, index2, data2, Te, EM, dTe, dEM,$
IDL > sat1=sat1,sat2=sat2,unc1=unc1,unc2=unc2,/average
Note that Te (K) and EM (cm-3) are returned as log10 values as are their
uncertainties. Some ratios may have invalid temperatures and these are flagged
with Te=0. data1 and data2 do not need to be exposure normalized if
index1 and index2 are SXT index structures (since the index1 and index2 parameters can
optionally be scalar values which are the X-ray filter numbers).
The results may be displayed using different techniques. One way is to use a user
contributed routine:
IDL > tv_teem,Te,dTe,level=.3
where level= specifies the maximum value of dTe which is displayed. This
is a convenient way to suppress the display of pixels that have low statistical
significance.
There are two ways in which SXT images might be saturated (see the Instrument Guide). In the case of full-resolution images, saturation most likely occurs in the individual CCD pixels. In this case, the charge that is read out of the device is conserved, but it is distributed incorrectly. In the case of half- or quarter-resolution images, the saturation is most likely in the on-chip summing well. Pixels that are saturated will not produce a meaningful temperature and emission measure estimate. Because of the nature of this problem, there is no means to ``restore'' a saturated image to what it should have looked liked when the photons were initially absorbed in the CCD.
SXT_PREP optionally returns an sat array which will flag saturated pixels. It calls SXT_SATPIX to do this and this will only work if data passed to SXT_PREP have not been decompressed or background subtracted. If the sat array is passed into SXT_TEEM, then the routine will sum all the saturated pixels together and treat them as a ``macro" pixel. The output Te array will contain the resulting temperature and the EM array will contain the corresponding emission measure per pixel. For flare data which are acquired in full-resolution mode, this approach will give a mean estimate for the temperature and emission measure.
Because of the low gain of the SXT CCD camera, the ratio of DN/photon (depending on the filter) is between approximately 2 (Al.1) and 4 (Be119) for log10(Te) = 6.5. In full-resolution images, the CCD full-well corresponds approximately to DN = 3313. Normally, the exposure time is automatically adjusted so as to keep the peak intensity at approximately half the full-well capacity. So it is difficult to obtain accurate temperature and emission measure estimates in the faint portions of flare images which have inherent dynamic ranges exceeding 100.
One way to improve the signal-to-noise ratio is to trade spatial resolution
for photon flux, for example, by rebining the image. A procedure that does this
is SXT_SUMXY. The calling sequence is:
IDL > SXT_SUMXY,index,data,sumX,sumY,unc,sat
Another method is to use a user contributed routine called GO_TEEM which
allows the user to specify an arbitrarily shaped polygon region.
The vignetting function of the SXT is discussed in the Instrument Guide. Because the vignetting function is steeper for the thick filters, the temperature determination from the filter ratio will be effected somewhat by the position in the field-of-view of the SXT, especially when the filter ratio involves a thick/thin filter pair at the limb or near the edge of the SXT field-of-view. In this case, the vignetting effect should be corrected before calling SXT_TEEM.
SXT_TEEM does not make any corrections for scattering or the effects of the point-spread function. The X-ray scattering is a function which increases with X-ray energy (see the Instrument Guide). As a result, scattering is expected to be a bigger problem for the thicker filters. The user of SXT_TEEM should realize that this will sometimes result in higher than expected temperatures at the edges of bright flare kernels.
As mentioned in the Instrument Guide, the Neutral Density filter increases X-ray scattering. Even though the amount is small (about 0.7%), and therefore, does not affect the results in the bright portions of a flare, it can significantly alter the level of the faint emission outside the flare region. One should be careful, therefore, about the interpretation of temperatures in faint regions when one of the filter pairs includes the neutral density filter.
The GO_TEEM procedure computes the time-profile of the spatially averaged electron temperature (Te) and emission measure (EM) for a processed data cube. The results are plotted to the screen and are also saved to the return variables te, em, dte, and dem so they can be saved for later reference. The program prompts the user to select a pair of thin and thick filters to be used in the computation, an interpolation method (none is an option) and a reference image from the data cube from which the user can view in detail. Once the user has reviewed the selected reference image and decided which parts of the image to study, the user then uses various tools to specify small or large arbitrarily shaped regions to study the time-profiles.
Processed data cubes can be made in the following way:
A sample call for SXT_PREP is:
IDL > sxt_prep, in_index, in_data, out_index, out_data, unc_data, satpix, /reg
The out_index and out_data (in units of data number (DN)) can then be saved to a user created ``sda'' file with
a simple call to SAV_SDA:
IDL > sav_sda, 'my_processed_data', out_index, out_data
Example call to GO_TEEM:
IDL > go_teem, out_index, out_data, te, em, dte, dem, f11, fl2, time=time, $
IDL > comments=comments, unc=unc, satpix=satpix, /interp
Where:
| INPUT: | |
| out_index | index record. from SXT_PREP |
| out_data | data from SXT_PREP. |
| unc | (optional) data for computing error bars |
| satpix | (optional) data for flagging saturated pixels |
| /interp | flag requesting that SPLINE interpolation of the database |
| values is used (default is linear interp.) | |
| OUTPUT: | |
| te | list of log(Te K) |
| em | list of log(EM cm-3) |
| dte | 1s errors of Te |
| dem | 1s errors of EM |
| fl1 | dn/sec light curves for selected thick filter |
| fl2 | dn/sec light curves for selected thin filter |
| time | list of interpolated times |
| comments | list of user entered comments for plot titles |
A general discussion of the McTiernan spectral fitting programs is given on page 6.3.1 in the description of fitting WBS spectra.
Also available are spectrometer-type fits for SXT data. In order to do this, the regular SXT filter response functions are rewritten as if they are spectrometer channel response curves. SXT_FSP calls SXT_PREP and SXT_INTERP to get the data in the appropriate form. Then the routine ANY_FSP is called, which does the spectral fit in the same manner as the HXS or HXT. Only two types of fits can be used for SXT_FSP, the thermal SXR lines fit (tyspec = 10) or the single power law fit (tyspec = 1). Thus it is possible to get single temperature fits using three or more filters. SXTBOX_FSP does the same thing, except for regions chosen by the user, as in HXTBOX_FSP.
See the routines listed in the Appendix of this User's Guide on page A.4.